Table of Contents
- What is HPRC?
- What is this Document and How is it Organized?
- What File Transfer Protocols Does HPRC Support?
- How Do I Setup FireFox on HPUX to access HPRC?
- How Do I Access the HPRC File Transfer Browser-Based UI?
- Overview of the UI for a User with a Read-Write Account
- Overview of the UI for a User with a Read-Only Account
- Overview of the UI for a User with a Write-Only Account
- How Do I Use the Directory Browser?
- How Do I Upload Files via HTTPS?
- How Do I Rename a File?
- How Do I Create a New Directory?
- I have Write Access But No Directory Browser. How do I Delete Files or Directories?
What is HPRC?
HPRC stands for Hewlett Packard Enterprise Resource Center. It is Hewlett Packard Enterprise's standard file transfer service enabling large document exchange between customers Hewlett Packard Enterprise personnel and their customers or partners. HPRC provides the transport mechanism only and is not responsible for the files transferred nor the overall (total Internet) end-to-end solution. HPRC may only be used for Hewlett Packard Enterprise company business. HPRC is not backed up and is not a repository. Most HPRC drop boxes are subject to disk quota limits. Files should be removed after successful transfer. Use of HPRC implies acceptance of the HPRC Terms of Use and Service.What is this Document and How is it Organized?
This document provides instruction on how to use the HPRC File Transfer UI to access and manage the content of your HPRC drop site via an HTTPS browser. The document is divided into sections covering primary features and functions of the HPRC UI. Each section begins with a terse "expert" explanation which should suffice for users familiar with similar features found in other UIs. After the summary, more detail is provided, often accompanied by numbered diagrams for those who need additional help.What File Transfer Protocols Does HPRC Support?
HPRC supports FTPS (uses same ports as plain FTP), SFTP (on port 2222 only) and HTTPS (on port 443) protocols for file uploads and downloads as well as drop site management capabilities. The interfaces provided by this webservice UI allow web-based HTTPS uploads and downloads and are intended primarily for smaller file transfers by customers or external partners whose firewalls prohibit FTPS or SFTP on port 2222. This UI also simplifies some file and directory management although many modern FTP-based UIs (e.g. FileZilla recommended for use with HPRC) also provide excellent and intuitive file management capabilities.How Do I Access the HPRC File Transfer Service UI?
- Enter the HTTPS URL based on the DNS name where your drop box is hosted: in your browser.
- Check the box to indicate that you have read and accept the HPRC Terms of Use & Service.
- Login using the drop site account name and password provided by the Hewlett Packard Enterprise employee who created the drop site.
More Information ...
IE, Chrome, Firefox and Opera browsers have been tested with HPRC but most browsers should work. This URL can be saved in your browser favorites, if you so desire.When you see the login page as shown below, click on the checkbox to indicate your acceptance of HPRC Terms of Use & Service and login with the drop box account name and password provided you by the drop site owner, the Hewlett Packard Enterprise employee who created and configured the drop site and provided you the login credentials. If you have problems accessing the drop box, contact the drop site owner. In the figure, we are accessing a drop box using an account "ttttest". To login, refer to Figure 1 for details :
|
|
|
|
|
|
|
|
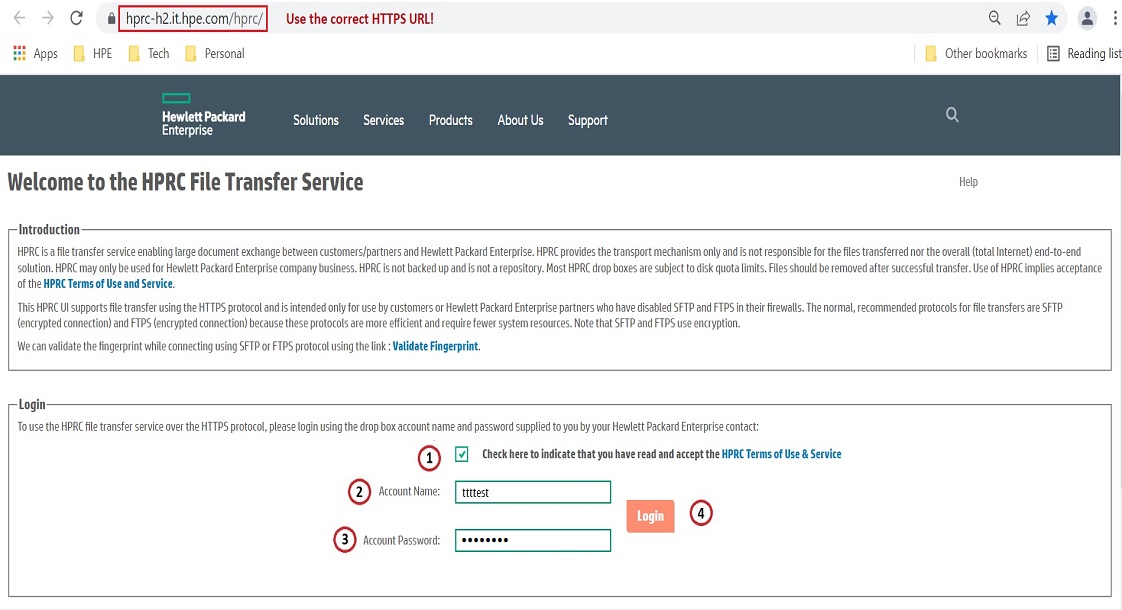
Figure 1. Login page of HPRC. |
Trouble Shooting Login ...
If unexpectedly redirected to the login page, you should be aware that HPRC has a built-in session time out. After a period of inactivity, if you select a link or button in the UI, you may be redirected back to the login page. If that happens, simply login again, navigate back to the location where you were working and resume your use of the UI. Timeouts should not happen while an upload or download is in progress.If you cannot login, first double check your login name and password. Both are case-sensitive. Passwords can contain symbols such as "=", "*", "_" and others as well as alpha-numeric characters. If the name and password matches the credentials provided by the Hewlett Packard Enterprise drop box owner, try this URL in your browser: https://hprc-h2.it.hpe.com. If this web page cannot be reached, you may have a firewall issue or the drop box host server may be down (unlikely). Check with your local networking expert or ask a colleague to try accessing the website. If the problem persists, contact the Hewlett Packard Enterprise employee drop box owner who sent you the credentials. He or she has access to the HPRC internal UI and can verify that the drop box still exists, has not expired, the password is still active, and so forth. Your Hewlett Packard Enterprise contact can also engage HPRC support for further assistance.
Overview of the UI for a User with a Read-Write Account
Most accounts used to access HPRC drop sites have full read and write capabilities. Users with read-write accounts have the following features available to them as shown in Figure 2:
A Directory Browser section for navigating the contents of the drop site. Users begin at the drop site's root ("/") or home directory (or folder). The key features of the directory browser are:
|
|
| A File Functions section for "write" operations on files, including file upload as well as a function for renaming a file. The file uploader Browse button initiates a file explorer function for locating and selecting a file to upload. Click the Upload File button to initiate the file upload. Upon completion, the MD5 digest of the uploaded file is displayed in the browser and can be used to confirm that the file reached the HPRC server intact and unaltered. | |
| A Directory Functions section allowing a user to create a subdirectory in the directory defined by the Current Location. | |
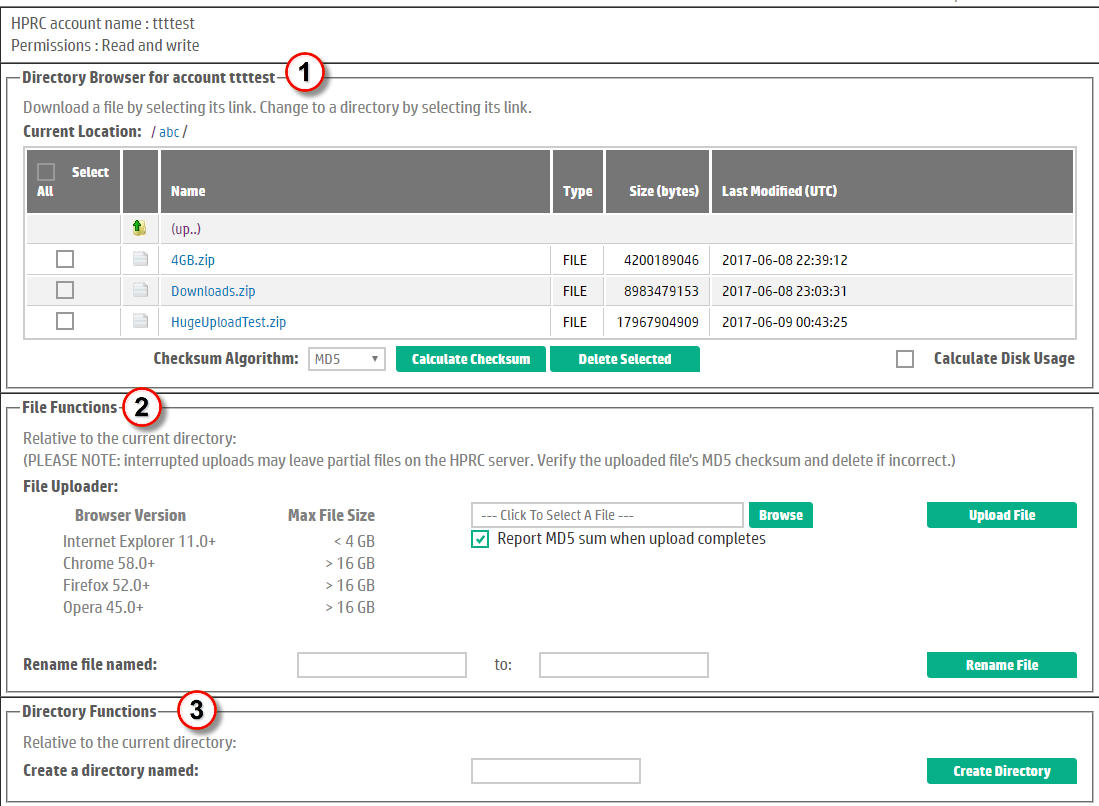
Figure 2. Home page for a Read-Write account. |
|
More Information ...
Detailed information on each section of the UI page summarized above can be found elsewhere in this document. Specifically:- For drop site navigation, downloading files, fetching MD5 digests or checksums, and deleting files or directories, see the detailed description of the Directory Browser
- For instructions on uploading a file, see the File Uploader
- To learn more about renaming a file, see Rename a File
- For details on creating a directory, see Create a Directory
Overview of the UI for a User with a Read-Only Account
An HPRC user with a read-only account has restricted access to the drop box. Specifically this type of account only allows navigation of the drop site and files to be downloaded from the HPRC server to your local machine. The user interface for a read-only account by default consists only of the Directory Browser as shown in Figure 3. The read-only user can use the Directory Browser to:| Identify the path to the directory currently viewed via a bread-crumb style navigator labelled Current Location. Any parent level can be accessed simply by selecting its hyperlink name from the path, or, the leftmost "/" to return to the drop site's home directory. | |
| Files can be downloaded by selecting the hyperlink file name. | |
| Subdirectories are accessed by selecting a directory hyperlink. | |
| The check boxes on the left can be selected to Calculate MD5 For Selected Files. | |
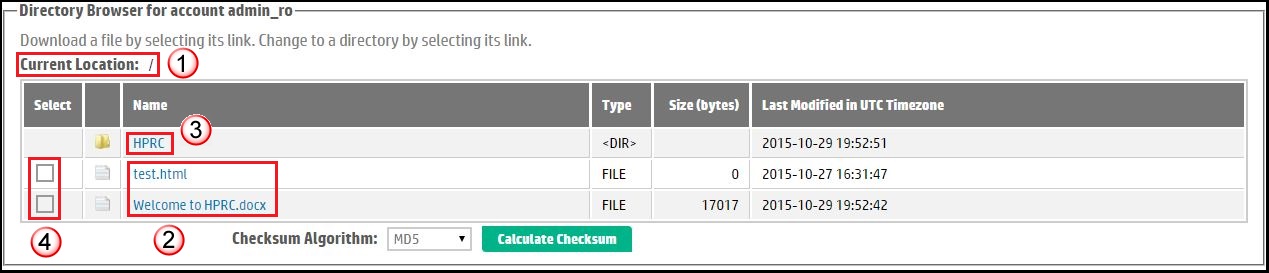
Figure 3. Home page for a Read-Only account. |
|
More Information ...
Detailed information about using the Directory Browser for drop site navigation, downloading files, fetching MD5 digests or checksums, can be found in the Directory Browser section of this document.Overview of the UI for a User with a Write-Only Account
HPRC supports the concept of a write-only account for a few businesses only. Most write-only accounts are accessed programmatically, an automated process simply logs in, optionally may create a subdirectory, uploads a file and exits again. If a user were to log in with a write-only account, by default they would see the features shown in Figure 4.|
|
|
|
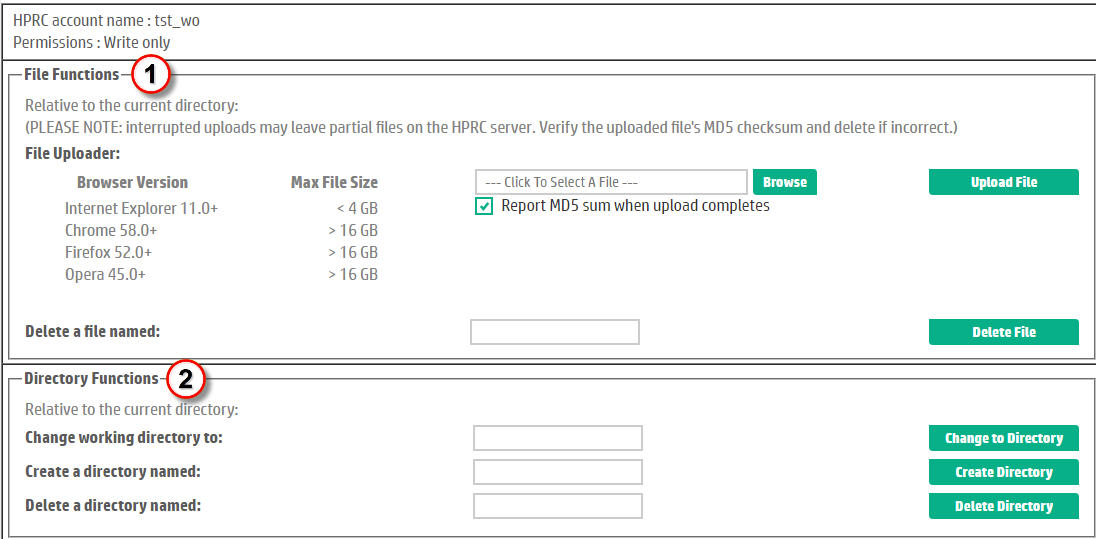
Figure 4. Home page for a Write-Only account. |
More Information ...
Detailed information on each section of the UI page summarized above can be found elsewhere in this document. Specifically:- For instructions on uploading a file, see the File Uploader
- To learn more about renaming a file, see Rename a File
- For details on creating a directory, see Create a Directory
- For details on deleting an empty directory, see Delete an Empty Directory
How Do I Use the Directory Browser?
Within the Directory Browser, you can use the following tools to navigate the drop site:- To navigate down one level, select the name of a sub-directory from the file listing. A new file listing will be shown containing the contents of the selected sub-directory.
- To navigate up one level to a parent directory, select the "(up ...)" link, if one is shown. The file listing will be updated to contain the parent level's files and directories. You cannot navigate "up" out of your drop box root directory.
- To navigate to an arbitrary level above your current location, select the corresponding link from the Current Location bread-crumb style path.
To refresh the current file listing, select the right-most hyperlink in the Current Location path.
To download a file, navigate to the file's location in the drop box and select the file's hyperlink. A browser pop-up will prompt you whether you want to open the file or save it. Typically, you will want to save the downloaded file to a location on your local computer. The pop-up contains features which allow you to navigate to a location on your computer where you wish to save the file.
To calculate MD5 checksums check the Select boxes of the files for which HPRC should calculate the checksums. Select the Calculate MD5 For Selected Files button. The MD5 sums for the selected files will appear in an area below the button. Selected directories are ignored.
To delete files or directories (and their contents), check the Select boxes for the items you want to delete and click on the Delete Selected button. WARNING: HPRC currently initiates the delete action without requesting confirmation from the user. It is very easy to delete a large and complex hierarchy of files in this manner.
More Information ...
An HPRC drop site (also called a drop box), can be likened to a secured directory or folder on a computer's file system. The directory can contain regular files that have been uploaded to the HPRC FTP servers as well as other directories nested below it to an arbitrary depth. The HPRC File Transfer Service Directory Browser allows users with the proper read-write or read-only credentials to navigate up and down the drop site hierarchy of folders, to view a file listing at your current location in the drop box hierarchy, and download the regular files from the drop box to a local computer. Furthermore, the Directory Browser provides facilities to easily collect MD5 digests (also called checksums) that help users determine whether the files in a drop box were uploaded successfully and completely. For users with read-write permissions, the directory browser also provides an intuitive facility for removing one or more files and/or sub-directories from a drop box. An example Directory Browser for a read-write user is shown in Figure 5. In the figure:| the current location is the root or home directory. | |
| the file listing shows 2 files ("test.html", "velocity.log") as well as a sub-directory ("my_subdirectory") that can be found at the root level. Files are accompanied by their size in octets (bytes). Directories and files alike also show the date last modified. The file's modification date is generally the date the file was uploaded to HPRC. A directory modification date is the date the directory was created or when the contents of that directory were last changed. | |

Figure 5. How to use Directory Browser. |
|
Navigating the Drop Box Hierarchy
The Directory Browser provides several important navigation features:First, near the top of the Directory Browser, you will see a bread-crumb style indicator of your current location or directory path within the drop box, aptly named Current Location. You can click on any link in this path to return to the corresponding directory in the drop box. The leftmost "/" indicates the root level (or home directory) for the drop site. By clicking on this "/", you can immediately return to the drop box home directory. Selecting any hyperlink in the Current Location path causes HPRC to fetch the file listing for the selected directory and redisplay that listing. Also, the Current Location path is updated so that the right-most element in the path is always the directory whose contents are seen in the file listing.
Second, by default, all subdirectories in the file listing are represented as hyperlinks. By selecting the name of a directory, you "change directory" or change current location to that subdirectory. Changing the location appends the sub-directory's name to the the Current Location path. For example, suppose we began in the drop site's root directory as shown in Figure 5. If we select the hyperlink for the directory called "my_subdirectory", and then clicked down further into sub-directory "another subdir" below "my_subdirectory", we would see the Current Location path extended as shown in Figure 6 and the Directory Browser now displaying the file listing of "/my_subdirectory/another subdir", which currently contains only the sprrev.zip file.
Third, the Directory Browser presents you an "(up...)" hyperlink which allows you to navigate up one level to the parent directory of the current working directory or current context. If you select the "(up...)" link from the example in Figure 6, HPRC would repaint the page with the Directory Browser showing a listing of the files and subdirectories in "/my_subdirectory", the Current Location would be adjusted similarly. You cannot navigate up out of your drop box root (or home) directory.

Figure 6. Navigating the Drop Box Hierarchy.
Refreshing A File Listing
If two or more people are concurrently modifying the contents of a drop box, it is possible for the file listing to go out of sync with the files actually on the HPRC FTP servers. If that happens, you can refresh your current context by clicking on the right-most element in the Current Location path. In Figure 5 above, the right-most element is the "/" indicating the drop site's home directory. In Figure 6, the right-most element is the "my_subdirectory" link in the Current Location path. The right-most element always corresponds to the directory you are currently "in".Downloading A Regular File
You download a regular file simply by selecting it's name. For example, to download the the test.html file shown in Figure 6 above, you would navigate the drop box to the directory which contains test.html (i.e. "/my_subdirectory"), and then simply select the test.html file name. HPRC currently does not support downloading a directory of files. Instead, selecting a directory navigates the user into that directory. Upon selecting a file for download, the user sees a browser-generated pop-up window which provides you the option to open the file in the browser (some files should never be opened this way) or to save the file to your local disk. HPRC recommends that you save the file rather than opening it.Calculating File Checksums
An MD5 digest (also called "sum", "hash" or "checksum") is a compact digital fingerprint of a file generated using a hash algorithm against the content of a file. Because almost any change to a file causes its MD5 digest to change, this checksum is a standard mechanism for verifying the integrity of files. You can rule out file corruption during transfer by calculating the checksum and comparing it to the checksum calculated against the file on the source or download destination computer. HPRC supports 3 different algorithms for calculating checksums: MD5, SHA1, and SHA256.HPRC facilitates the calculation of a checksum as shown in Figure 7 below:
| Select the file (or files) for which you want digest(s). | |
| Optionally, select one of the alternate checksum algorithms. By default, MD5 is selected. | |
| Then click the Calculate Checksum button. If you accidentally include a directory among your selections, it will be ignored. | |
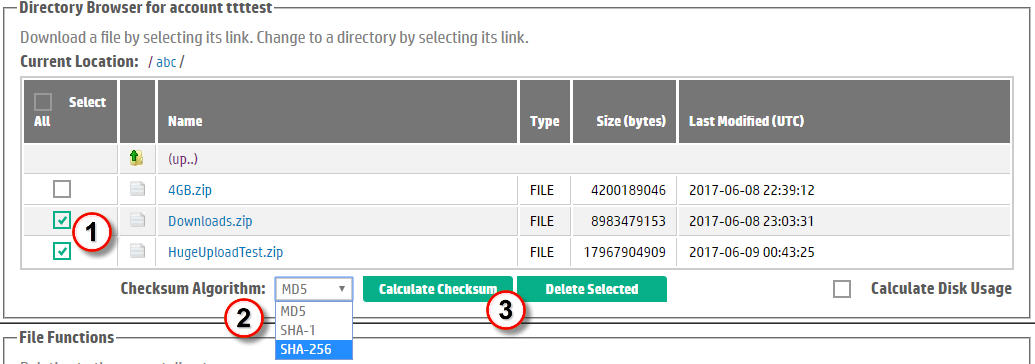
Figure 7. Calculating File Checksums. |
|
Figure 8 shows the checksum results for a different example set.
| Although all 3 items (including directory "my_subdirectory") in the directory listing were chosen, the checksums only for the files are shown in the results. When the MD5 sums have been calculated, they are displayed below the Calculate Checksum button. | |
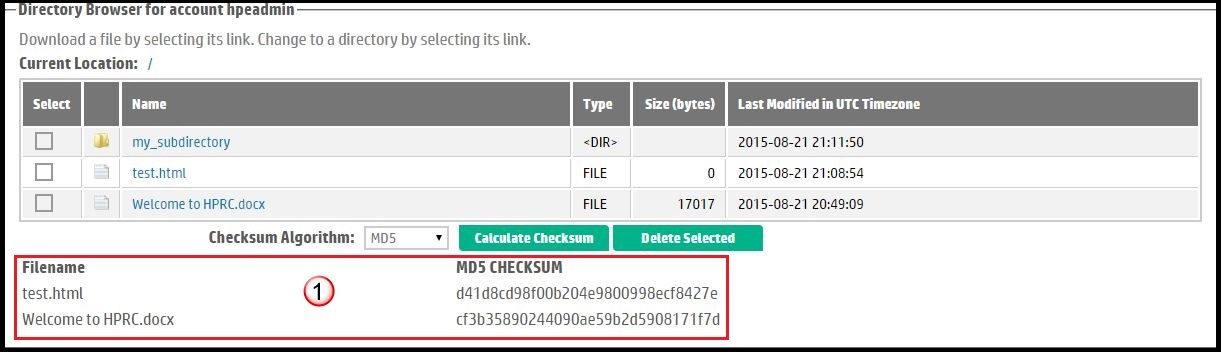
Figure 8. Displaying the MD5 checksum result. |
|
Deleting Files and/or Directories From the Directory Browser
File or directory deletion results in a change to a drop box contents. Consequently, by default, only users with read-write access privileges can delete a file or directory from the directory browser. Users with read-only accounts are not provided a Delete Selected button in the UI.The Select checkboxes in the Directory Browser serve double-duty between identifying files for calculating MD5 sums or for file and directory deletion. To delete one or more files and/or directories, select the checkbox to the left of the items to be deleted and then click on the Delete Selected button.
WARNINGS: Please use the delete functionality with care.
- HPRC does not provide for or request a deletion confirmation.
- Deleting a directory removes that directory and all of its contents.
- If a deletion operation is aborted by exiting the UI, at least some files and directories will still be lost.
- HPRC does not back up, nor can it recover items that were deleted by accident. The only recovery option is for the files to be re-uploaded from another source.
File and directory deletion is supported in the Directory Browser only for users with read-write access to HPRC.
How Do I Upload Files via HTTPS?
File uploads involve a "write" operation which modifies the drop box contents. Only users with read-write or write-only access can upload files.To upload a file from your computer to HPRC, you must complete the following steps:
- Scroll down the UI to the File Uploader. (For files more than 4 GB in size, use of Chrome, Firefox or Opera browser is recommended).
- Use the Browse button to locate the file to upload.
- Use the Upload File button to initiate the upload.
More Information ...
HPRC provides a basic HTTPS uploader which utilizes established and stable browser technology but the maximum file size may be limited to files 4 GBs or less in size depending on your choice of browser. To upload files, please refer to Figure 9:| Either type the full pathname to the file you wish to upload into the text-entry widget, or, use the Browse button to start the browser's file explorer utility. If using the Browse button, navigate to the directory where the file to be uploaded exists, select the file, and click the submit button (usually called "Open" or "Open File"). The file pathname will be loaded into the text box by the browser. | |
| (Optionally) disable reporting the MD5 sum of the uploaded file. Typically you will want to see the MD5 sum to verify the integrity of the uploaded file. | |
| Click the Upload File button to begin the upload. | |
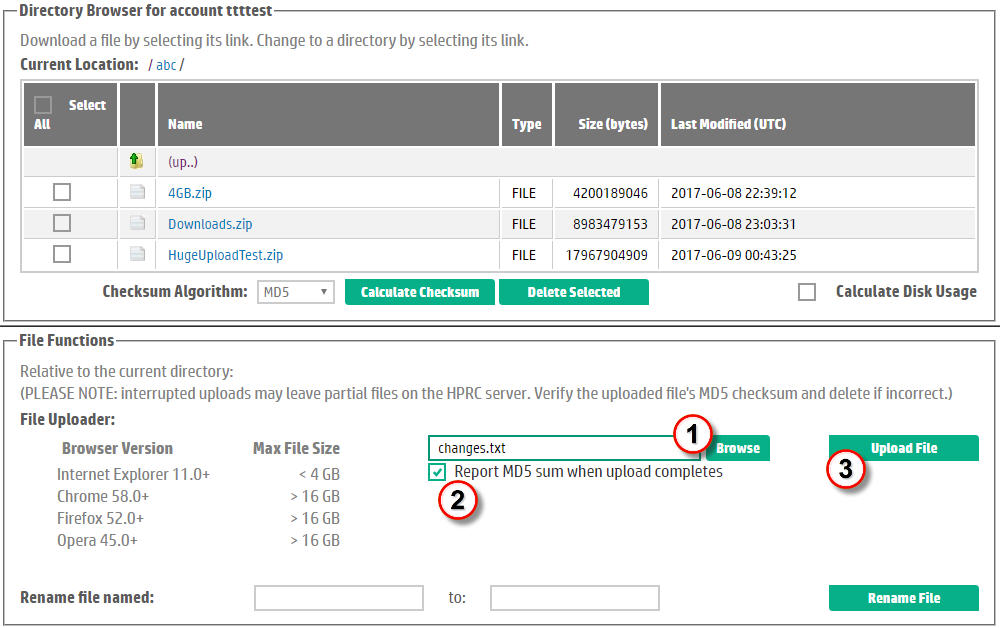
Figure 9. Upload a File over HTTPS. |
|
After the uploader completes, HPRC may log you out if the browser has timed-out. Otherwise, HPRC refreshes the Directory Browser to include the newly uploaded file. Also, the MD5 digest for the uploaded file is displayed under the upload prompts as shown in Figure 10.
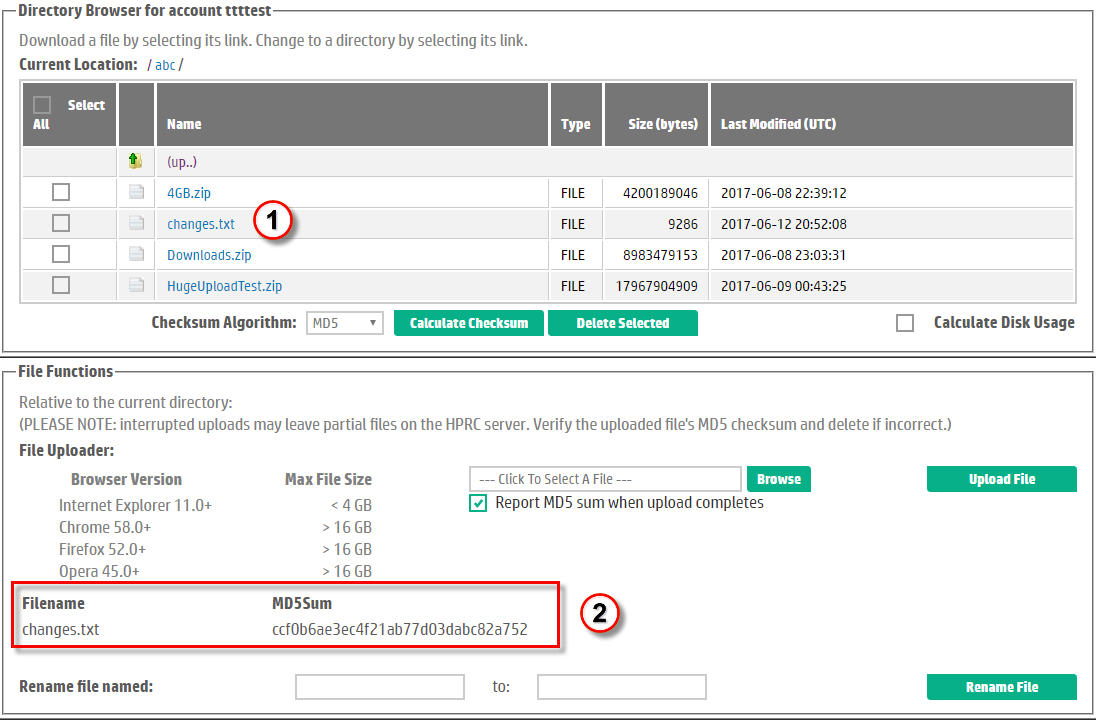
Figure 10. Upload result, showing MD5 Digest.
What happened to the file upload applet? HPRC used to provide an applet that could be used to upload files of almost any size. As a security precaution, most browsers no longer permit the execution of a plugin applet. The applet no longer works with any browser and has been removed. Most browsers, other than Internet Explorer, now support the upload of very large files with the built-in uploader.
How Do I Rename a File?
Renaming a file involves a "read" component to access the file being renamed and a "write" component to update the directory with the file's new name. Consequently, by default, renaming a file is a feature available only to users who can access an HPRC drop site with a "read-write" account.To rename a file, navigate to the directory containing the the file to rename and then:
| Enter the name of the file to be renamed in the first text entry widget. You can cut and paste the file name from the file listing but be careful not to click on the file to be renamed or HPRC will misinterpret your action as a file download request. | |
| Enter the new name of the file in the text box following the "to:" prompt. | |
| Click on the Rename File button to complete the renaming action. | |
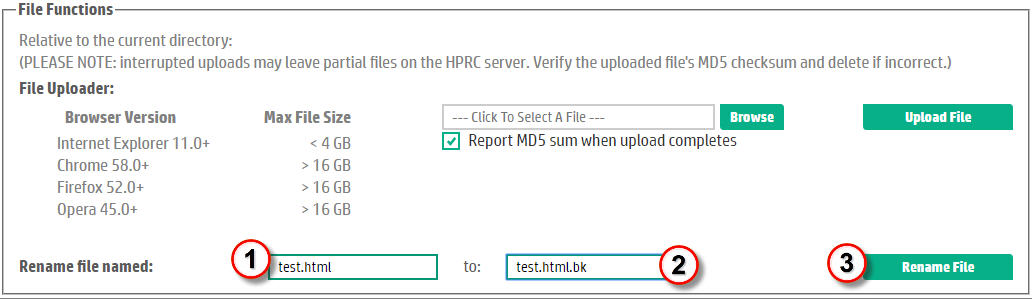
Figure 11. How to Rename a File. |
|
After the file is renamed, HPRC will refresh the file listing in the Directory Browser so you can verify the file has been correctly renamed.
Trouble-Shooting "Rename a File" ...
To rename a file successfully, you must spell the file's name exactly as it appears in the drop box. The new file name cannot already exist as a directory or file name. Finally, the "rename a file" functionality does not permit you to move the file from one location or directory in the drop box to another location.How Do I Create a New Directory?
Creating a directory is a write operation and available only to users who login with a read-write or write-only account.To create a directory,
- Navigate to the location in your drop box where you want to create the new directory.
- The the name of the of the new directory in the text entry widget by the prompt labelled, "Create a directory named:".
- Click the Create Directory button to actually create the directory.
Most users with permission to create a directory can navigate to the proper location using the Directory Browser, selecting the parent directory from the Current Location path, or by traversing down the directory hierarchy by clicking on the necessary sub-directory links. Users with a default WO account do not have the Directory Browser facility and should use the "Change Working Directory to:" text widget instead to enter the absolute pathname (begins with "/" and uses "/" as pathname separators) to a known existing directory which will be the context (or parent) for the new directory to be created.
If the directory is created successfully and if you are logged in with a read-write account, HPRC will refresh the file listing in the Directory Browser. If you are logged in with a write-only account, the directory is created silently.
If the directory already existed or cannot be created, an error message is displayed.
I have Write Access But No Directory Browser. How do I Delete Files or Directories?
Because users with write-only accounts cannot perform drop site read operations, they operate "blind" inside the drop box. They do not have or need a Directory Browser and so HPRC provides an alternative solution for deleting files or directories.The assumption made by HPRC is that the owner of a write-only account knows the layout of the drop box by means other than by viewing the drop box. In reality, the few HPRC drop boxes that have write-only accounts are configured such that the write-only users upload files only to the drop box home (or root) directory, or, perhaps create a subdirectory at the root level for their own use and into which they deposit their files. Most write-only users of HPRC are programs, not interactive users.
File Deletion without a Directory Browser
To delete a file, the user must navigate to the drop box directory containing the file and then enter the name of the file to delete. Referring to Figure 12, this involves the following steps:| In the text entry box labeled "Change Working Directory To:", enter the path to the directory containing the file to be deleted. This can be either an absolute pathname from the drop box root (or home) directory (i.e. specify a pathname beginning with "/") or a simple sub-directory of the current location. | |
| Click the Change to Directory button to change the current context. If the directory changed successfully, the operation will silently succeed. Otherwise (e.g. the directory does not exist), an error message will be displayed. | |
| Type the name of the file to be deleted in the text box accompanying the "Delete a File named:" prompt. | |
| Click the Delete File button to delete the file. Again, if the deletion succeeds, it does so silently. Otherwise, an error message is posted. | |
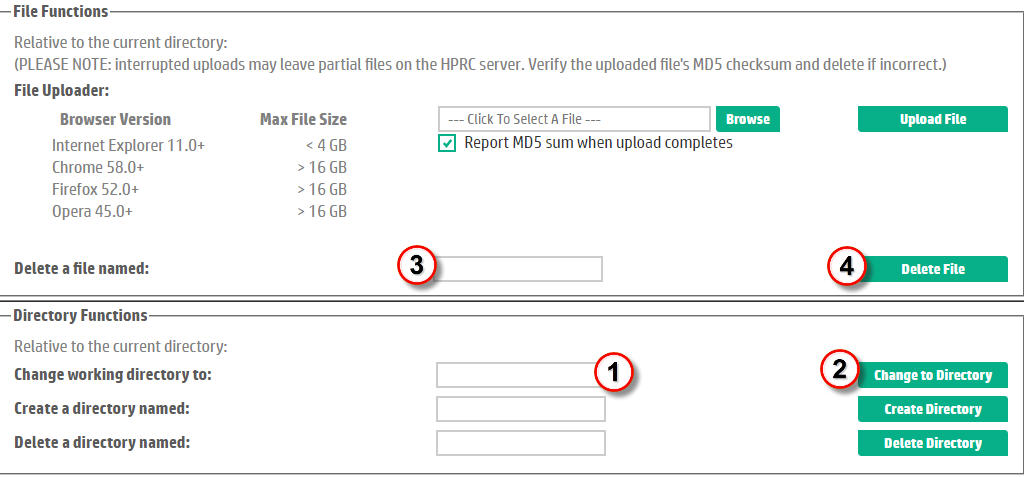
Figure 12. File Deletion without a Directory Browser. |
|
Directory Deletion without a Directory Browser
To delete a directory, the user must navigate to the drop box parent directory containing the subdirectory to be deleted and then enter the name of the directory to delete. Note, HPRC does not permit the deletion of the root "/" directory. Referring to Figure 13, this involves the following steps:| In the text entry box labeled "Change Working Directory To:", enter the path to the directory containing the file to be deleted. This can be either an absolute pathname from the drop box root (or home) directory (i.e. specify a pathname beginning with "/") or a simple sub-directory of the current location. | |
| Click the Change to Directory button to change the current context. If the directory changed successfully, the operation will silently succeed. Otherwise (e.g. the directory does not exist), an error message will be displayed. | |
| Type the name of the directory to be deleted in the text box accompanying the "Delete a Directory named:" prompt. | |
| Click the Delete Directory button to delete the directory. Again, if the deletion succeeds, it does so silently. Otherwise, an error message is posted. | |
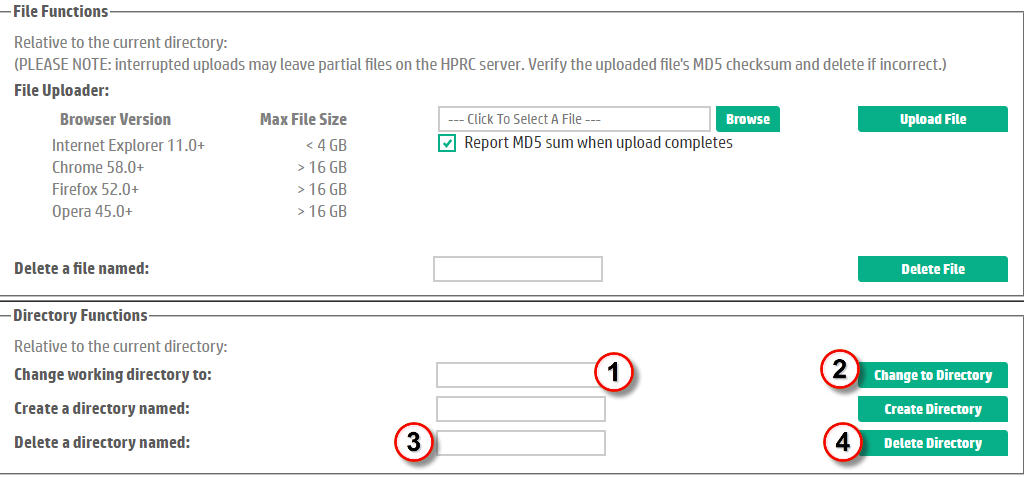
Figure 13. Directory Deletion without a Directory Browser. |
|